
Dot Matrix Printing with a 3D Printer
by Matthew Rayfield on February 18th 2019
Almost a year ago, in my quest to misuse my 3D printer in every way imaginable, I did a project where I used my 3D printer as a pen plotter. It worked well, but you had to have a vector image to print from. Which got me thinking... Why not take a regular bitmap image and have the printer draw dots for each pixel, dot matrix style?
I wrote a little script to generate the gcode and it worked pretty well... So I decided to whip it up as a simple web app that you can use to do the same! I also added support for multi-color prints! Continue reading for a quick run down on how to use it.
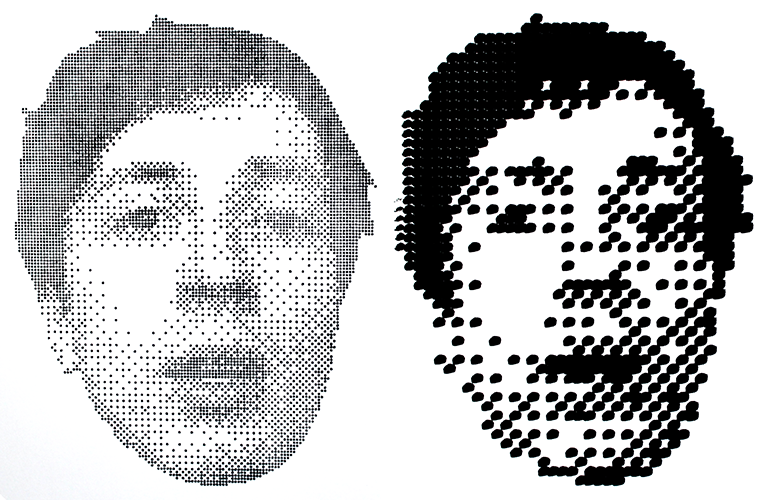
( 1mm spaced dots print vs 3mm spaced dots print )
The Tool
You can find the tool I've made here: Pixels-to-Gcode
This tool lets you load an image (almost any format will work), tweak it to optimize for printing, and then generate the gcode to print with.
I believe it's pretty self-explanatory, but here's a run down of the settings:
After you load the image at the top, you'll see input and output images side by side. The Print Size input will show the size of the resulting print. You can change either the width or the height to scale the image as desired and to size it to fit your printer.
Print Offset will offset where the print starts in relation to 0,0 on your printer. This is needed because you probably have not attached the drawing implement at exactly the same position as your printer's nozzle. I just leave it at 50,50 and although that is not precise at all, it keeps my print on the bed how I want it. Adjust to your needs.
Z Movement sets the z axis position of "pen" up and "pen" down. I have my down at 1mm rather than 0 because I want the nozzle out of the way and I can adjust the pen to be touching at 1mm.
Feedrate changes the speed of all print movements. 10000 works fine for me. 20000 worked but was little scary.
Dot Gap is essentially the resolution of the print. Or pixel density perhaps is a better term. If set to 1mm, each pixel will be drawn on a grid of 1mm sized squares. This mostly should be adjusted to match the size of your drawing implement.
Number of Colors is (uhhhhh) how many colors you want to generate for the image. Changing this number will add more color specific controls below.
Target Color controls what color is being extracted from the image. It defaults to black, and my guess is this would be your first color of choice to capture most details.
Color Threshold controls how close to the Target Color a pixel has to be to show in the output. Adjust this with the slider and watch the output image until you're happy with it.
Dither Strength changes how much dithering is applied to the image. No dithering at all and the image will look like a stencil. Adjust this with the slider until you like the look.
The Download Color button will download the generated gcode for that specific color. Each color will have it's own gcode
Lastly, Start Gcode is gcode that is included at the top of each color's gcode file. This can be modified to do whatever setup your printer needs prior to printing. In the default Start Gcode the printer is instructed to go home, move up to 4mm on the z axis and then pause 20 seconds. For me, this works. The pause gives me time to attach my pen or marker to the print head and adjust it so that it's ready to print. You may have to modify this gcode for your needs.
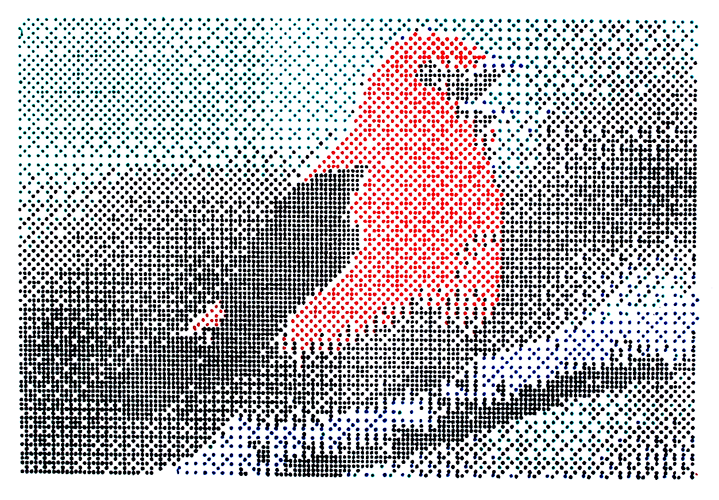
( 4 color print, black, red, green, blue )
And that's it
As far as attaching your drawing implement to your printer, you're on your own. If you have an Anet A8 you could use my bracket and a rubber band... But it kinda sucks so you'd probably be better off just taping a marker to the print head. You'll figure it out!
Fiddle with the settings. Get the image looking how you want. Setup however many different colors you desire. Download the gcode(s). Duct tape a marker to your printer, and go to town.
If you end up using this and making something, please let me know! I'd love to see what you do!
Check me out on Twitter: @MatthewRayfield.
Or subscribe to my almost-never-bothered email list here.
Orrrr if video is your thing, check out my YouTube channel!
Thanks and bye for now!